

1 Before you start
This is not graded, and it does not count towards anything. Answer every question even if you are only guessing — having a go at something before you have been taught it is one of the best ways to remember it afterwards. The lesson ends with another short check, and there you will be shown the correct answer for anything you missed. Choose an option for every question and confidence rating, then click Submit answers.
You have opened a file in Vim, made a mess, and want to quit WITHOUT saving. What do you type?
Which key takes you from Insert mode back to Normal mode?
In Normal mode, what does dd do?
What does :wq do?
Which command replaces every "draft" with "final" throughout the whole file?
In Normal mode, what does typing 5j do?
Using Vim's verb-plus-motion grammar, which command deletes from the cursor to the end of the current word?
Which line in your ~/.vimrc makes Vim show line numbers down the left side?
I can open a file in Vim, make an edit, save it, and quit.
I can explain the difference between Normal mode and Insert mode.
I can get out of Vim without saving when I need to.
2 Introduction
Sooner or later, you will land in Vim—whether you choose to or not. It is installed on essentially every Linux server and cluster, it is the default editor for git commit messages, and it is what crontab -e drops you into.
- The famous beginner experience is opening Vim by accident and not being able to get out. This lesson fixes that. The goal is modest and practical: open a file, make an edit, save it, and quit—confidently, every time.
- Here is what we would be learning:
- The one big idea: Vim has modes.
- The escape hatch: how to quit, including without saving.
- Inserting text, moving around, and the edit verbs.
- Search and replace, and a survival workflow.
- Note: The goal of this section is not to make you an expert on Vim. It is to introduce some basic ideas for you to get started. Do not try and memorize every command.
3 The One Big Idea - Modes
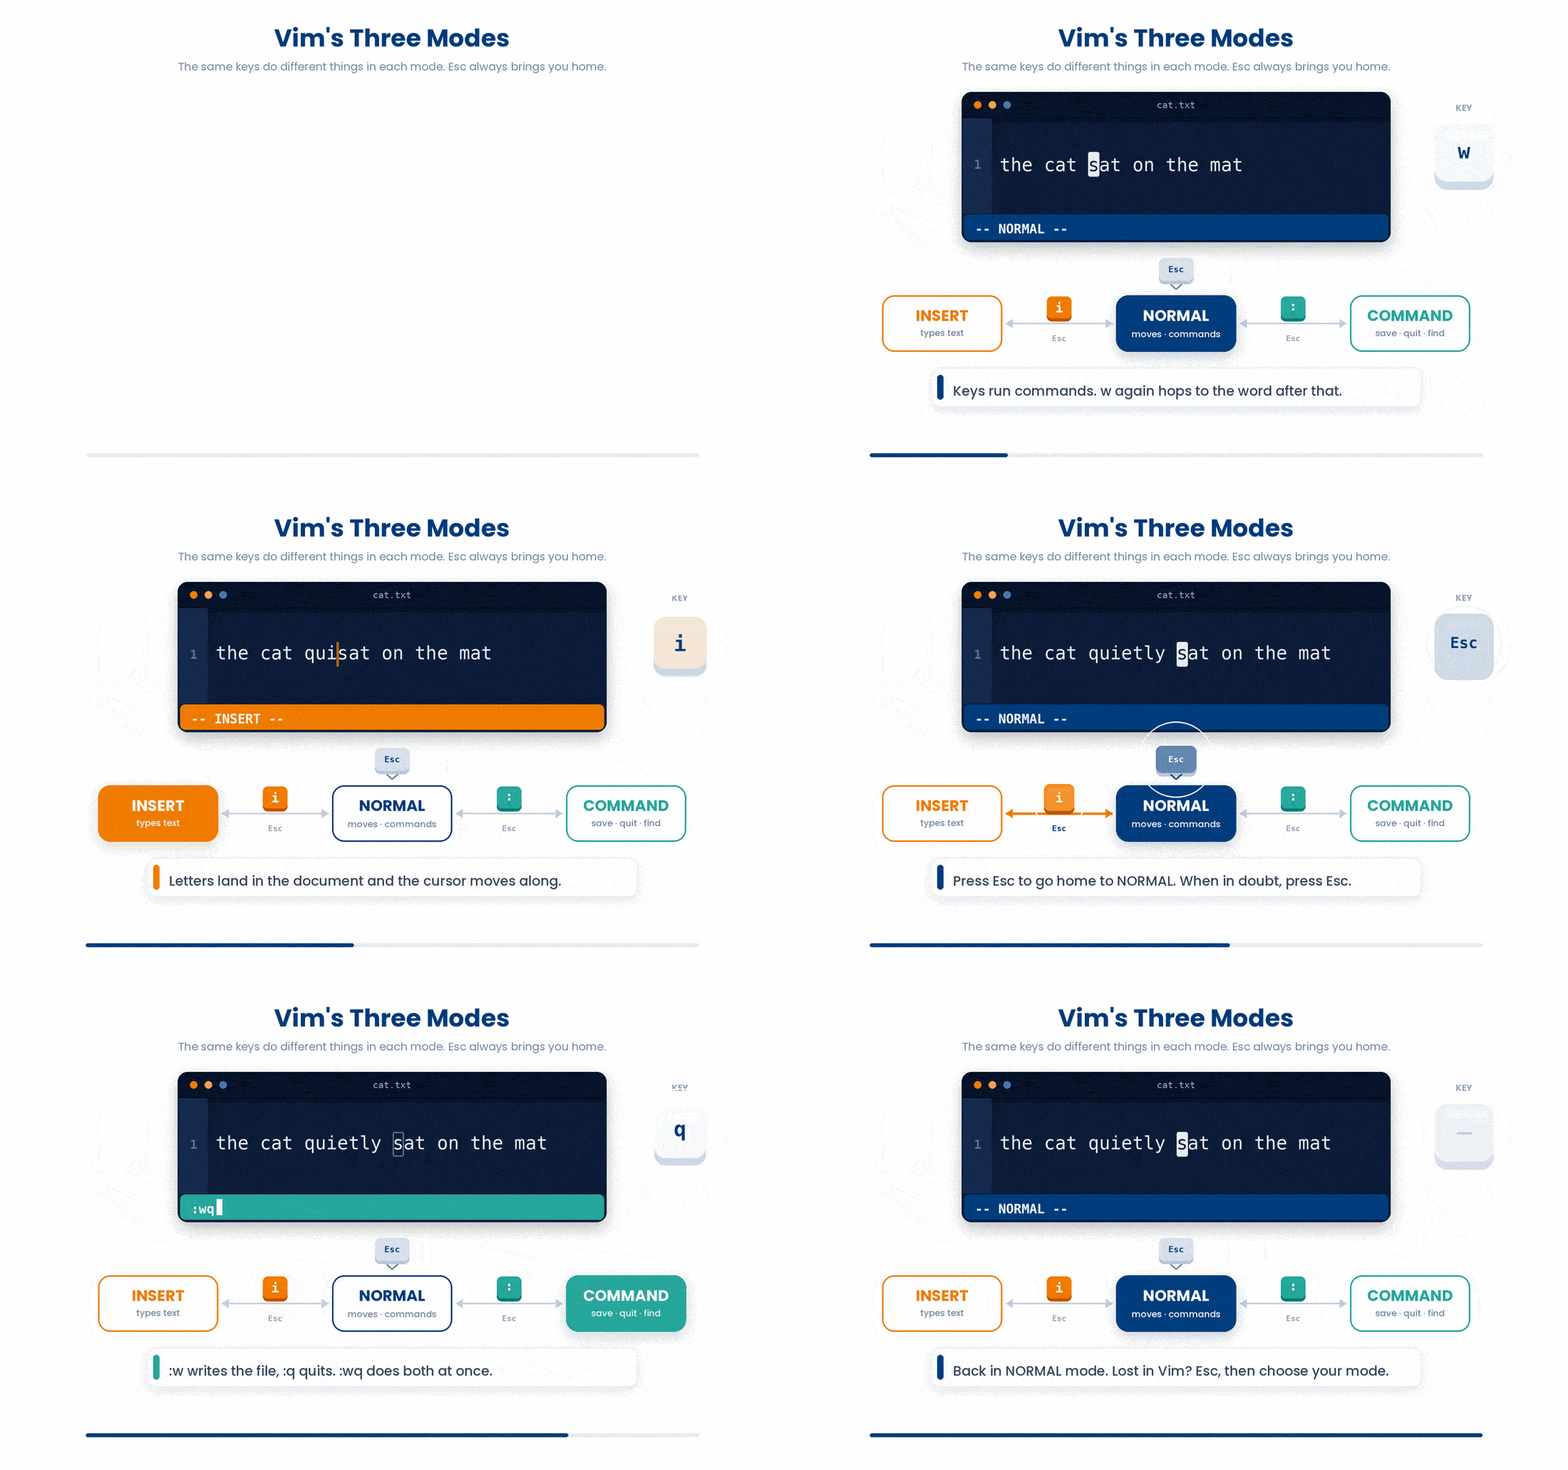
Most editors are always in "typing" mode: press k and a "k" appears on the screen. Vim is different. By default, it sits in Normal Mode, where every key is a command, not a character.
Three modes cover almost everything you need:
- Normal mode - the default. Keys move the cursor and edit. Press Esc to return here from anywhere.
- Insert mode - what you think of as ordinary typing. Enter with i, leave with Esc.
- Command-line mode - for save, quit, and search-replace. Enter by typing a colon (:).
When in doubt, press Esc. It always takes you back to normal mode, your safe home base. If a keystroke does something bizarre, you were probably in the wrong mode. Press Esc and try again.
4 Opening, and the All-Important Exit
Open a file (creating it if it does not exist), simply pass it to vim:
Try this snippet in the Bash Scratchpad on the right.
$ vim analyse_cohort.shYou start in Normal mode. To quit, first make sure you are in normal mode (press Esc), then type one of these and press Enter:
- :q - quit (only works if you have not made changes).
- :q! - quit and throw away changes. The exclamation mark means "force".
- :wq - write (save) and quit. This is the one you want most days.
- :w - write (save) but stay in the file.
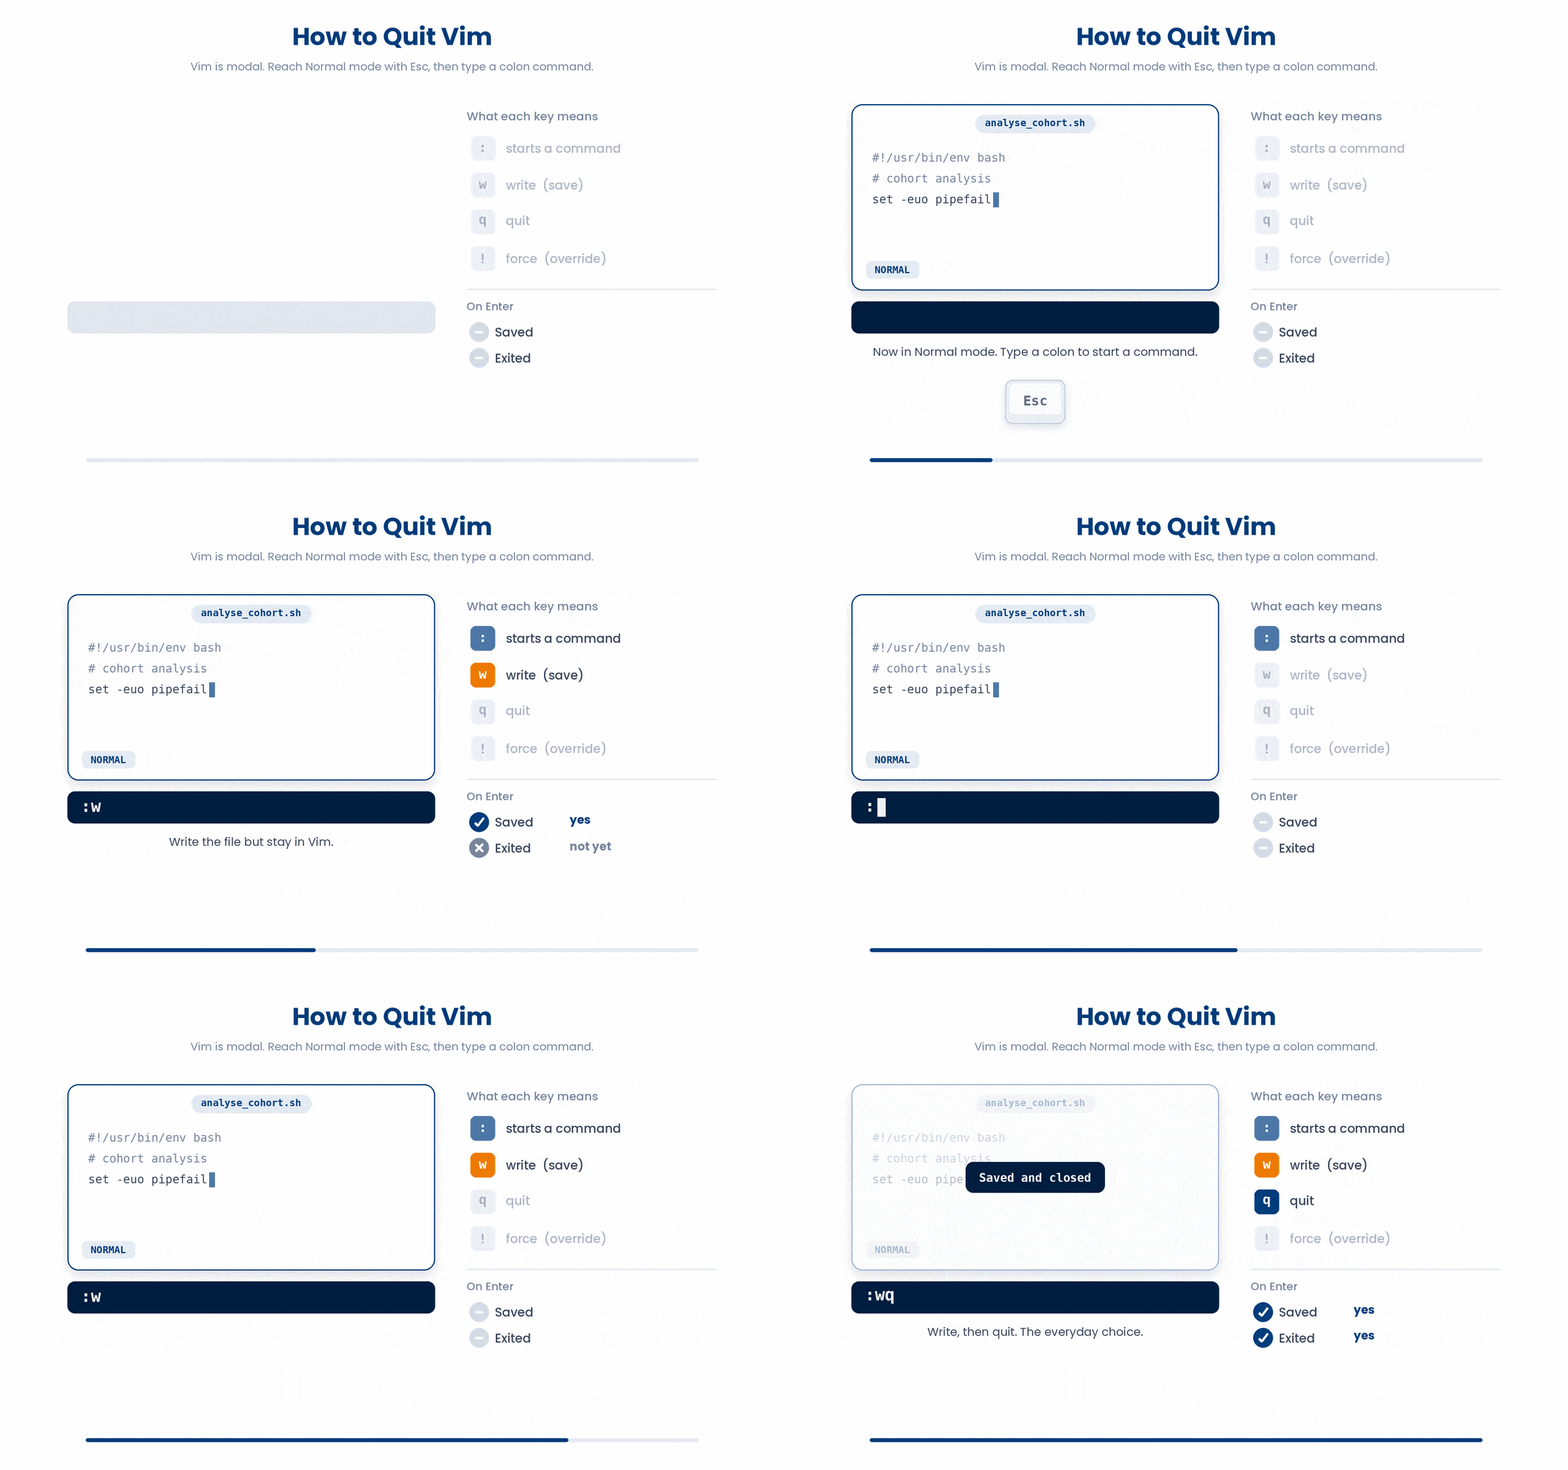
There is also a normal-mode shortcut: ZZ (two capital Zs, no colon) saves and quits, the same as :wq; and ZQ quits without saving, like :q!.
Memorise the recovery sequence: Esc, then :q! then Enter. That gets you out of any Vim, no matter what state it is in, discarding whatever mess you made. It is the single most reassuring thing to know.
Try it out — open a file, then get straight back out:
Try this snippet in the Bash Scratchpad on the right.
$ echo "NORMAL mode. To escape: press Esc, type :q! and press Enter." > escape_me.txt
$ vim escape_me.txt5 Inserting Text
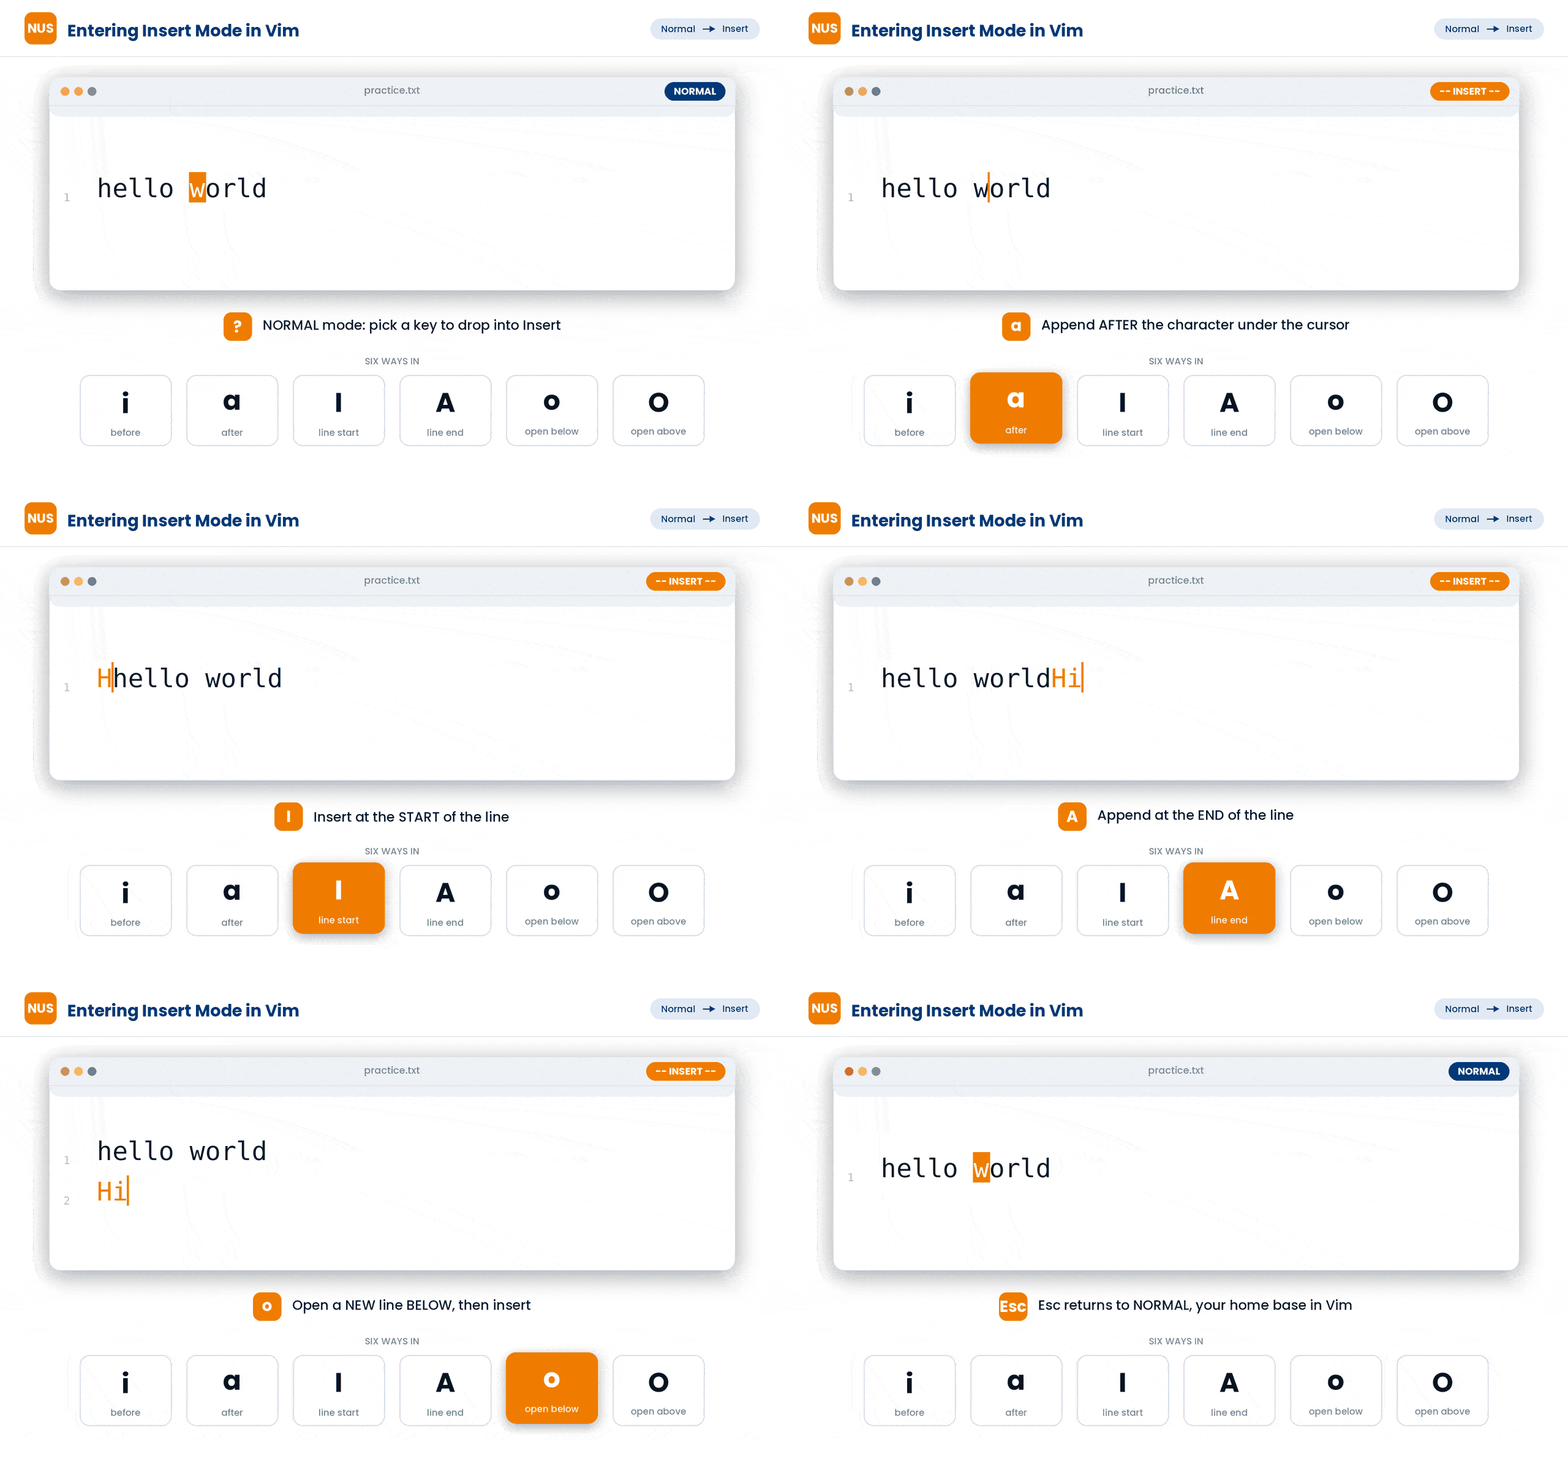
From normal mode, several keys drop you into Insert mode. Each one places your cursor in a slightly different starting position:
- i - insert BEFORE the cursor.
- a - insert AFTER the cursor (append).
- o - open a new line BELOW and insert.
- O - open a new line ABOVE and insert.
- I - insert at the start of the line.
- A - insert at the end of the line.
Once in insert mode you type normally, just like any editor.
The moment you finish typing, press Esc. Living in Normal mode is how Vim is meant to be used.
Try it out!
Try this snippet in the Bash Scratchpad on the right.
$ echo "Open me, press i to insert, type a line, then Esc and :wq to save." > practice.txt
$ vim practice.txt6 Moving Around in Normal Mode
You can use the arrow keys, but Vim is built around four home-row keys so your hands never have to move.
h - left,
l - right,
j - down,
k - up.
Plus a set of bigger jumps that save enormous amounts of time:
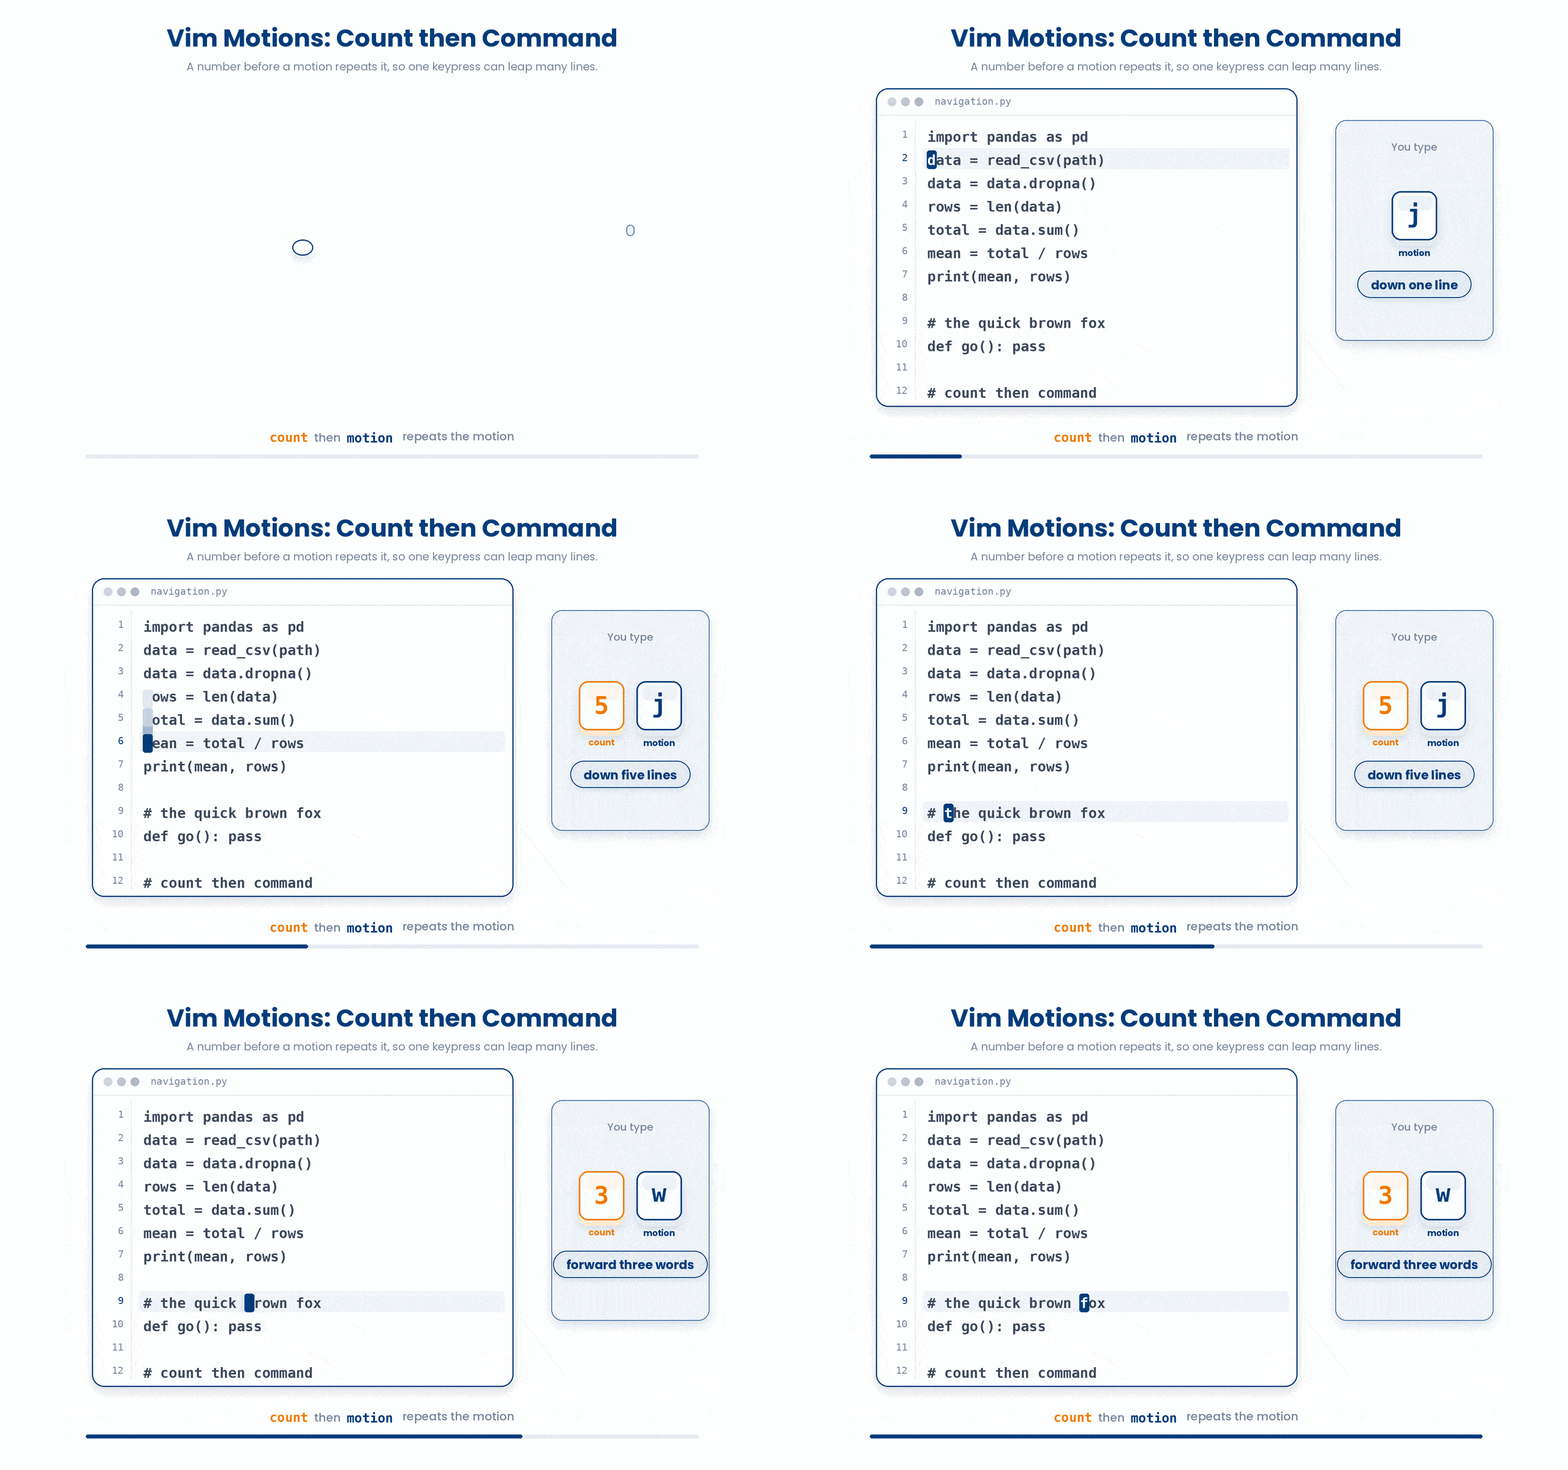
- Word: w - forward one word; b - back one word.
- Lines: 0 - start of the line; $ - end of the line.
- Files: gg - top of the file; G - bottom of the file.
- Specific line: :42 - jump to line 42 (handy when an error message names a line).
- Scrolling: Ctrl-d - down half a screen; Ctrl-u - up half a screen.
A number before a motion repeats it. Typing 5j moves down five lines. Typing 3w jumps forward three words. This "count then command" pattern runs throughout all of Vim.
Try it out — open a long file and move around with gg, G, :42, 5j and Ctrl-d, then leave without saving using :q (no changes made):
Try this snippet in the Bash Scratchpad on the right.
$ vim cohort_2026.csv7 Editing - Verbs and the Grammar
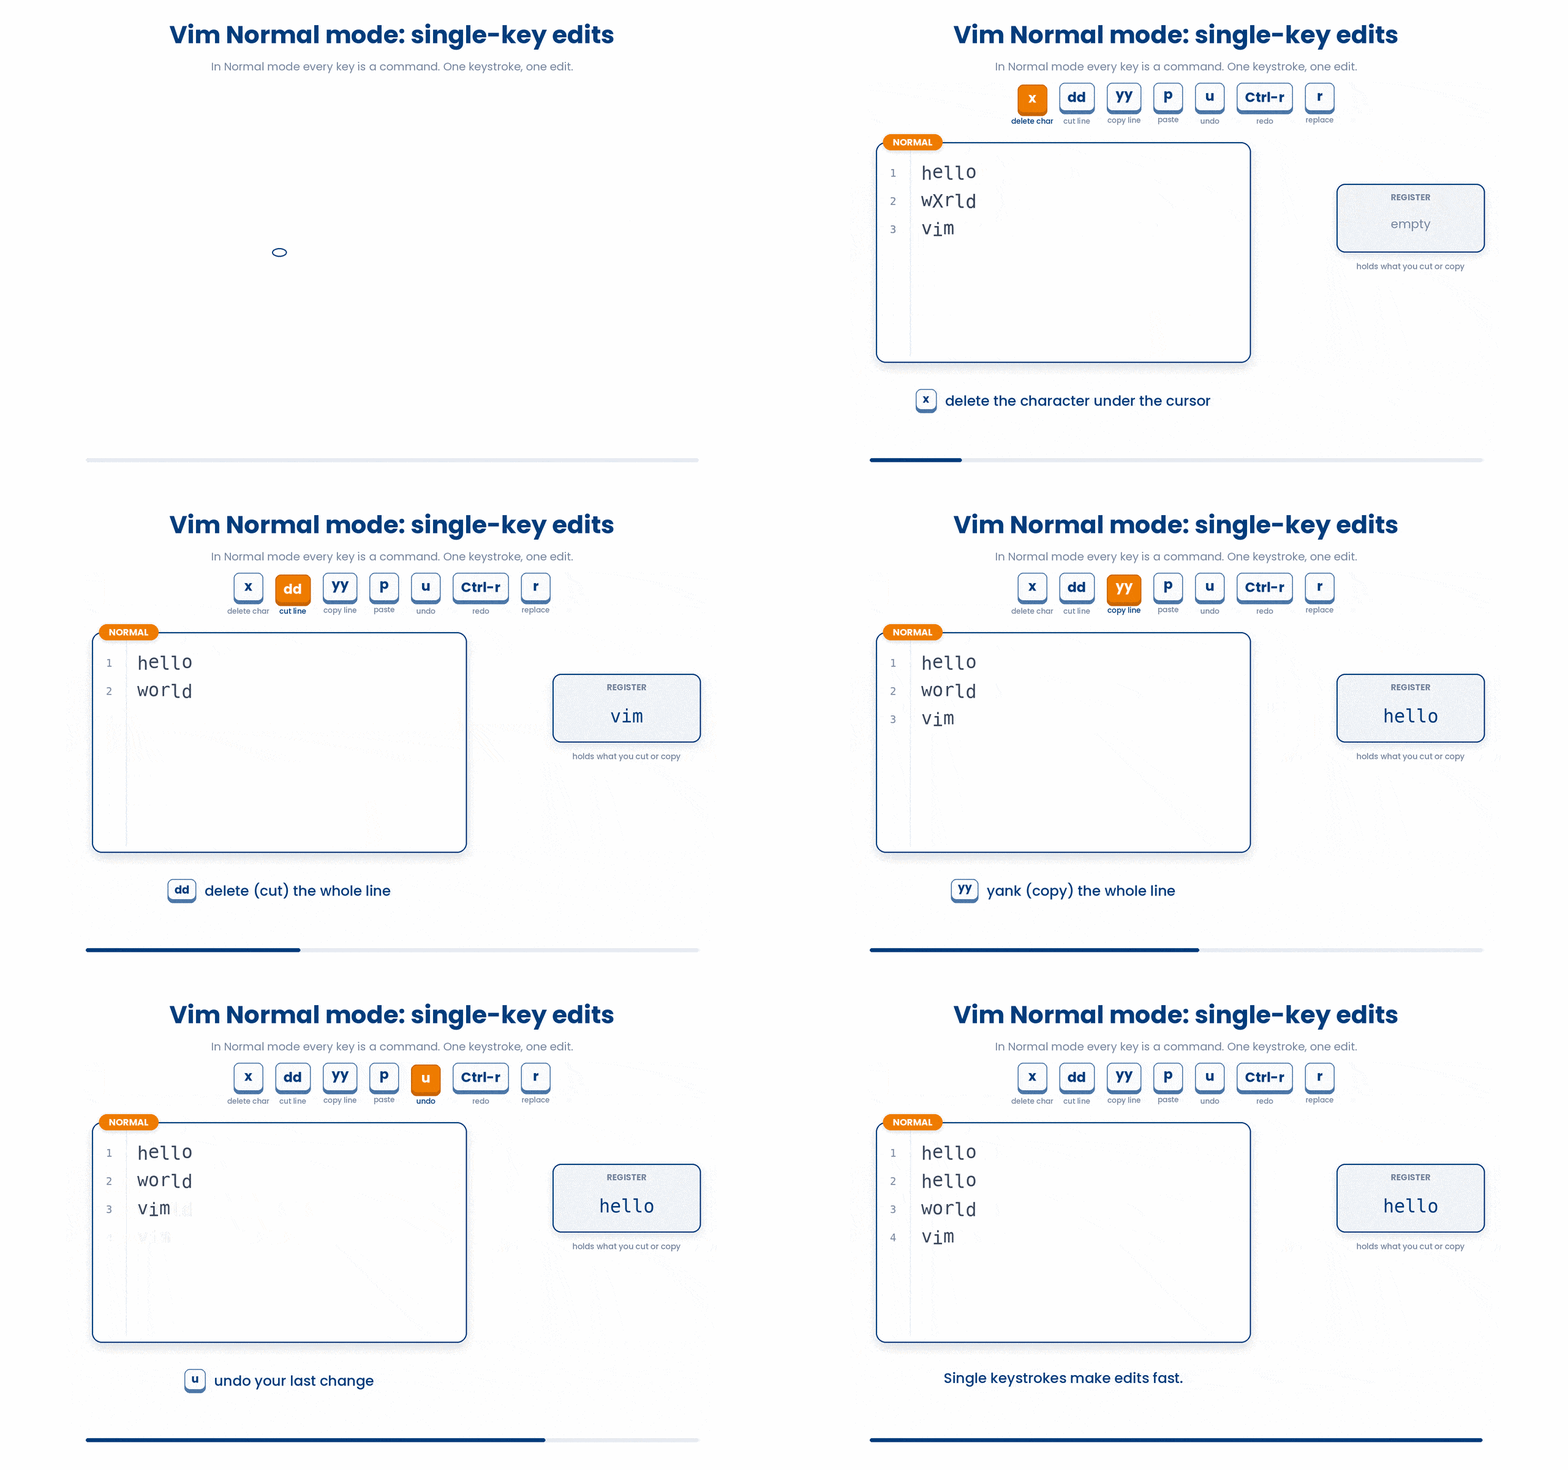
The fastest edits in Normal mode use single keys:
- x - delete the character under the cursor.
- dd - delete (cut) the whole line.
- yy - yank (copy) the whole line.
- p - paste after the cursor (P pastes before).
- u - undo; Ctrl-r - redo.
- r - replace the single character under the cursor.
The real power is that delete (d), change (c), and yank (y) are verbs that combine with the motions you just learned to perform complex actions. The grammar is verb + motion = action
- dw - delete to the end of the word.
- d$ - delete to the end of the line.
- dG - delete to the end of the file.
- cw - change a word (delete it and drop straight into insert mode).
- 3dd - delete three lines (count + verb).
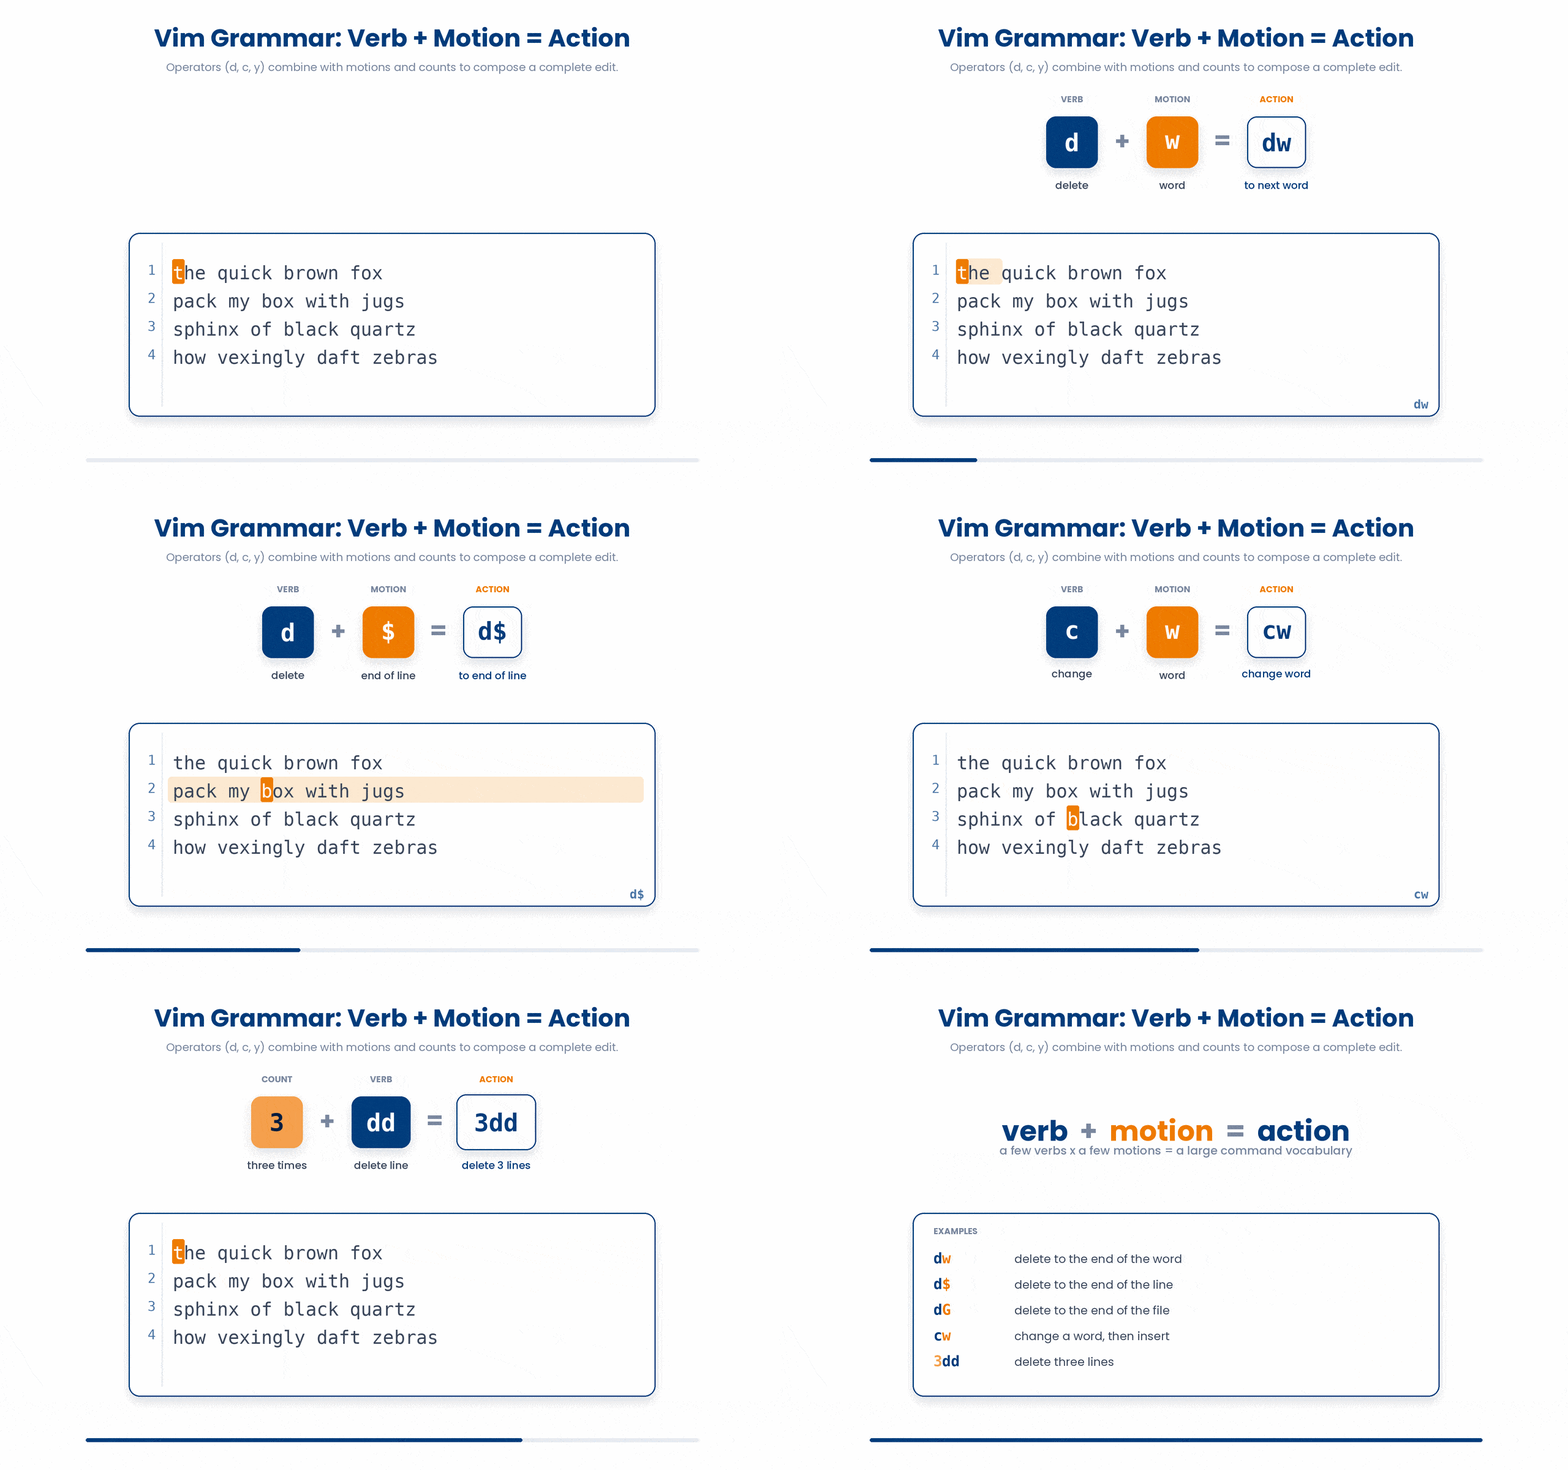
The change (c) verb works exactly like delete (d), but leaves you in Insert mode ready to type the replacement. Learn d and the motions, and c comes free because it follows the exact same grammar.
The . (dot) repeats your last change. If you change a word with cw, type the new text, and press Esc—you can just press . on the next word to repeat that entire sequence. Undo (u) and dot (.) together handle a surprising amount of heavy lifting.
Try it out — fix the typo with cw, then undo with u and repeat the change on the next word with the dot command:
Try this snippet in the Bash Scratchpad on the right.
$ echo "fix the typpo in this line with cw" > edit_me.txt
$ vim edit_me.txt8 Search, and Search-and-Replace
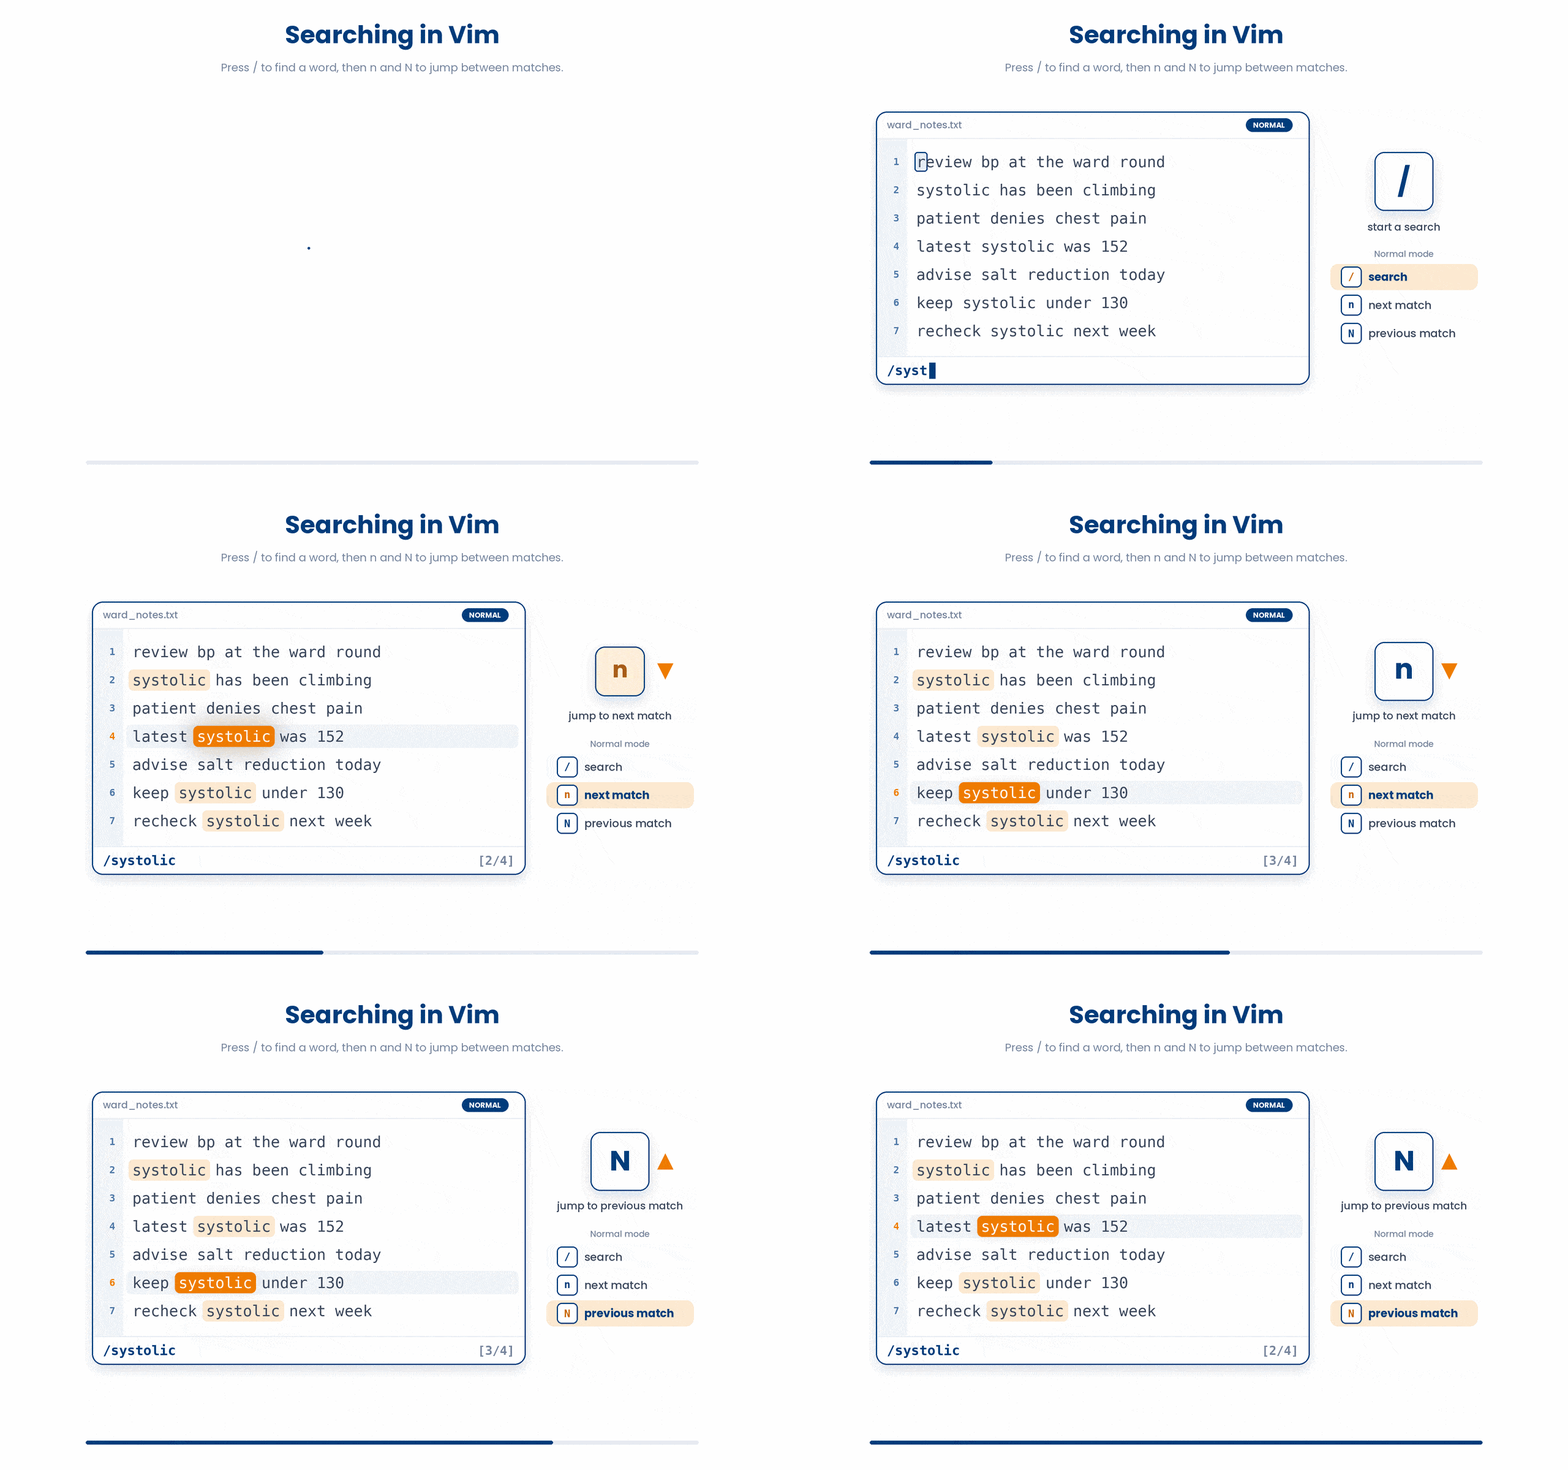
To search for a word or pattern, press / in Normal mode, type your pattern, and press Enter.
- n – Jumps to the next match
- N – Jumps to the previous match
/systolic
# then press n, n, n to step through each match
Note: The code above can only be done in vim
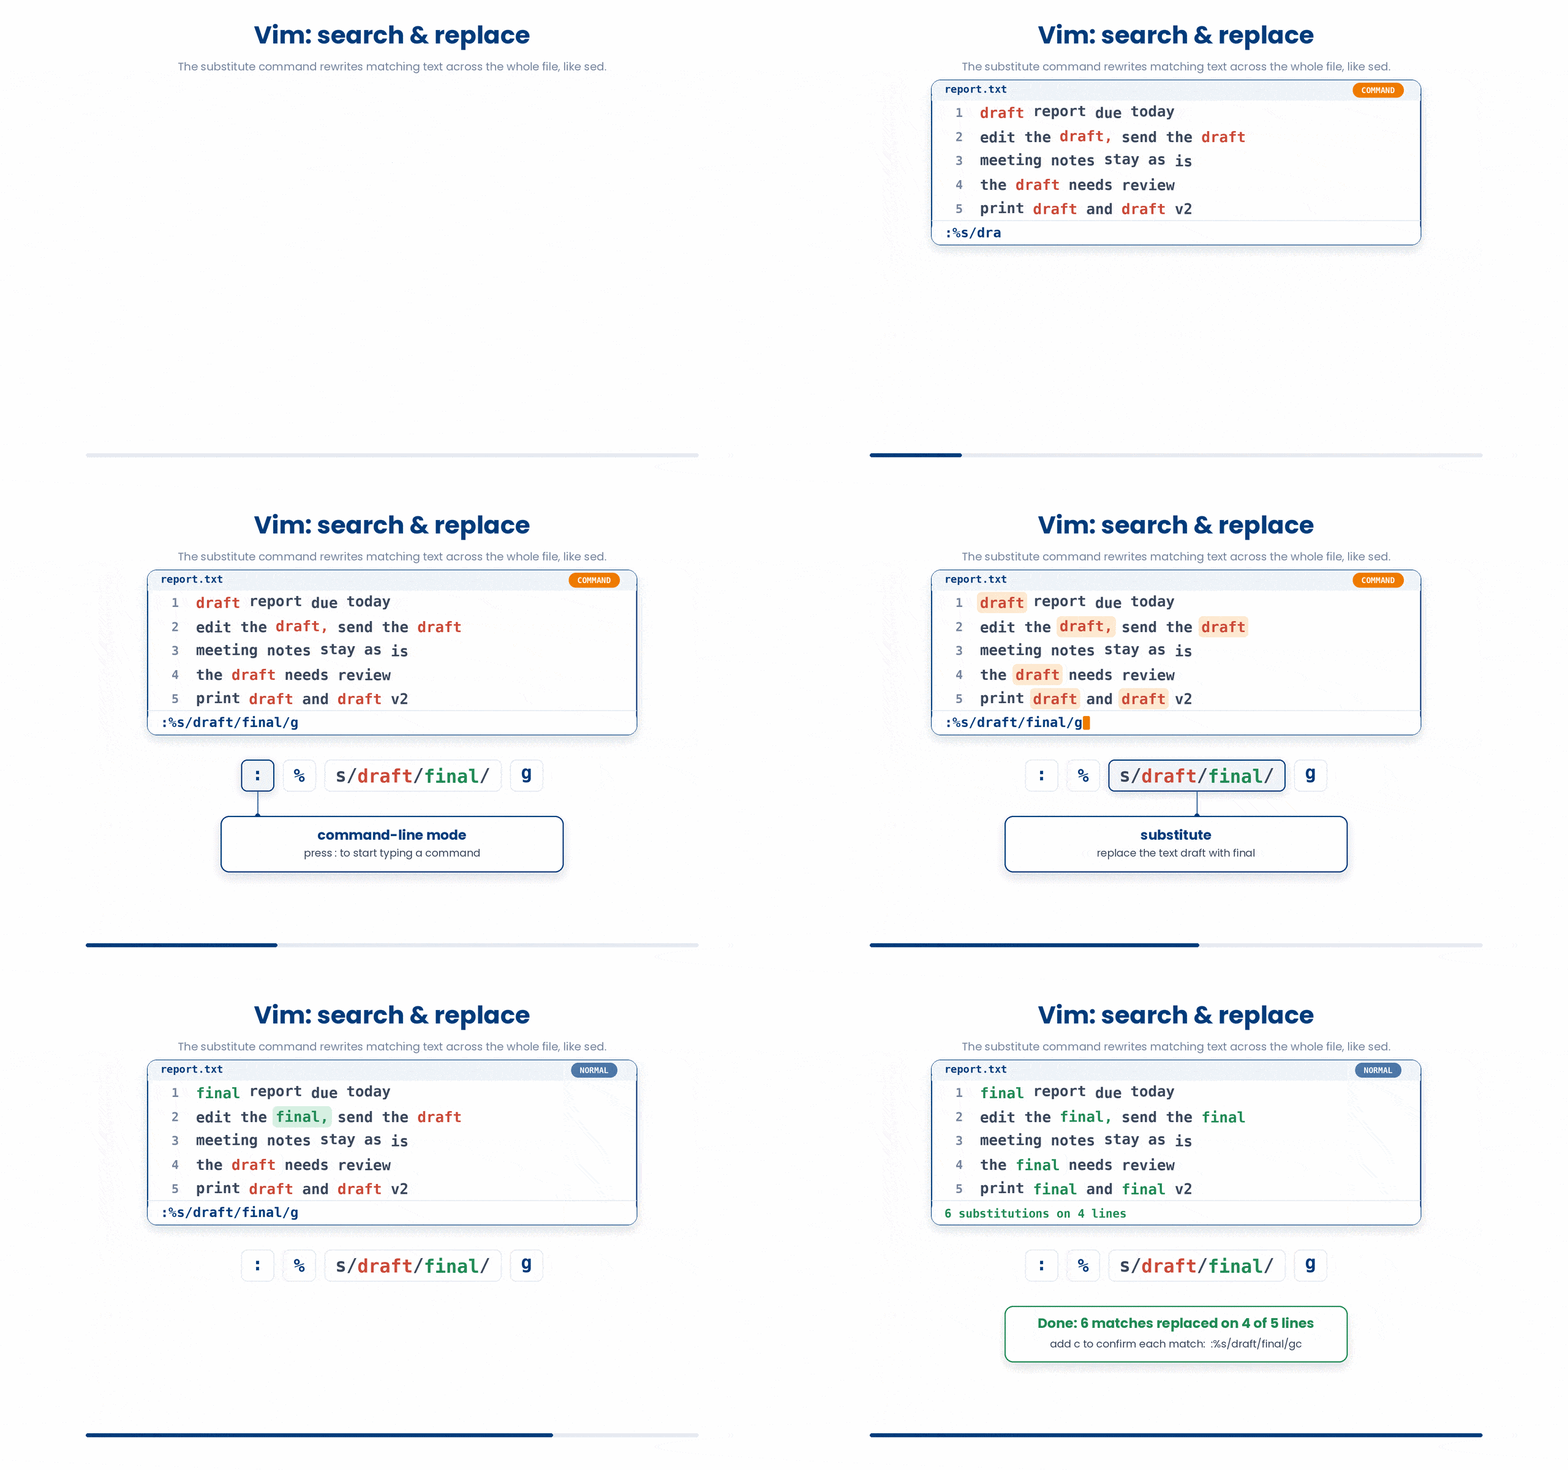
Search-and-replace uses command-line mode and looks just like sed command in Linux
:%s/draft/final/gNote: The code above can only be done in vim
Breaking down the command above:
- : - enter command-line mode.
- % - apply to every line in the file (without it, only the current line).
- s/draft/final/ - substitute the first "draft" on the line with "final".
- g - do it for every match on each line, not just the first.
Add a c on the end (:%s/draft/final/gc) and Vim asks for confirmation at each match (y/n).
Try it out — open this file, search with /draft then n, then replace every match with :%s/draft/final/g:
Try this snippet in the Bash Scratchpad on the right.
$ echo "draft results, draft table, draft figure" > draft.txt
$ vim draft.txt9 Visual Mode - Selecting Text
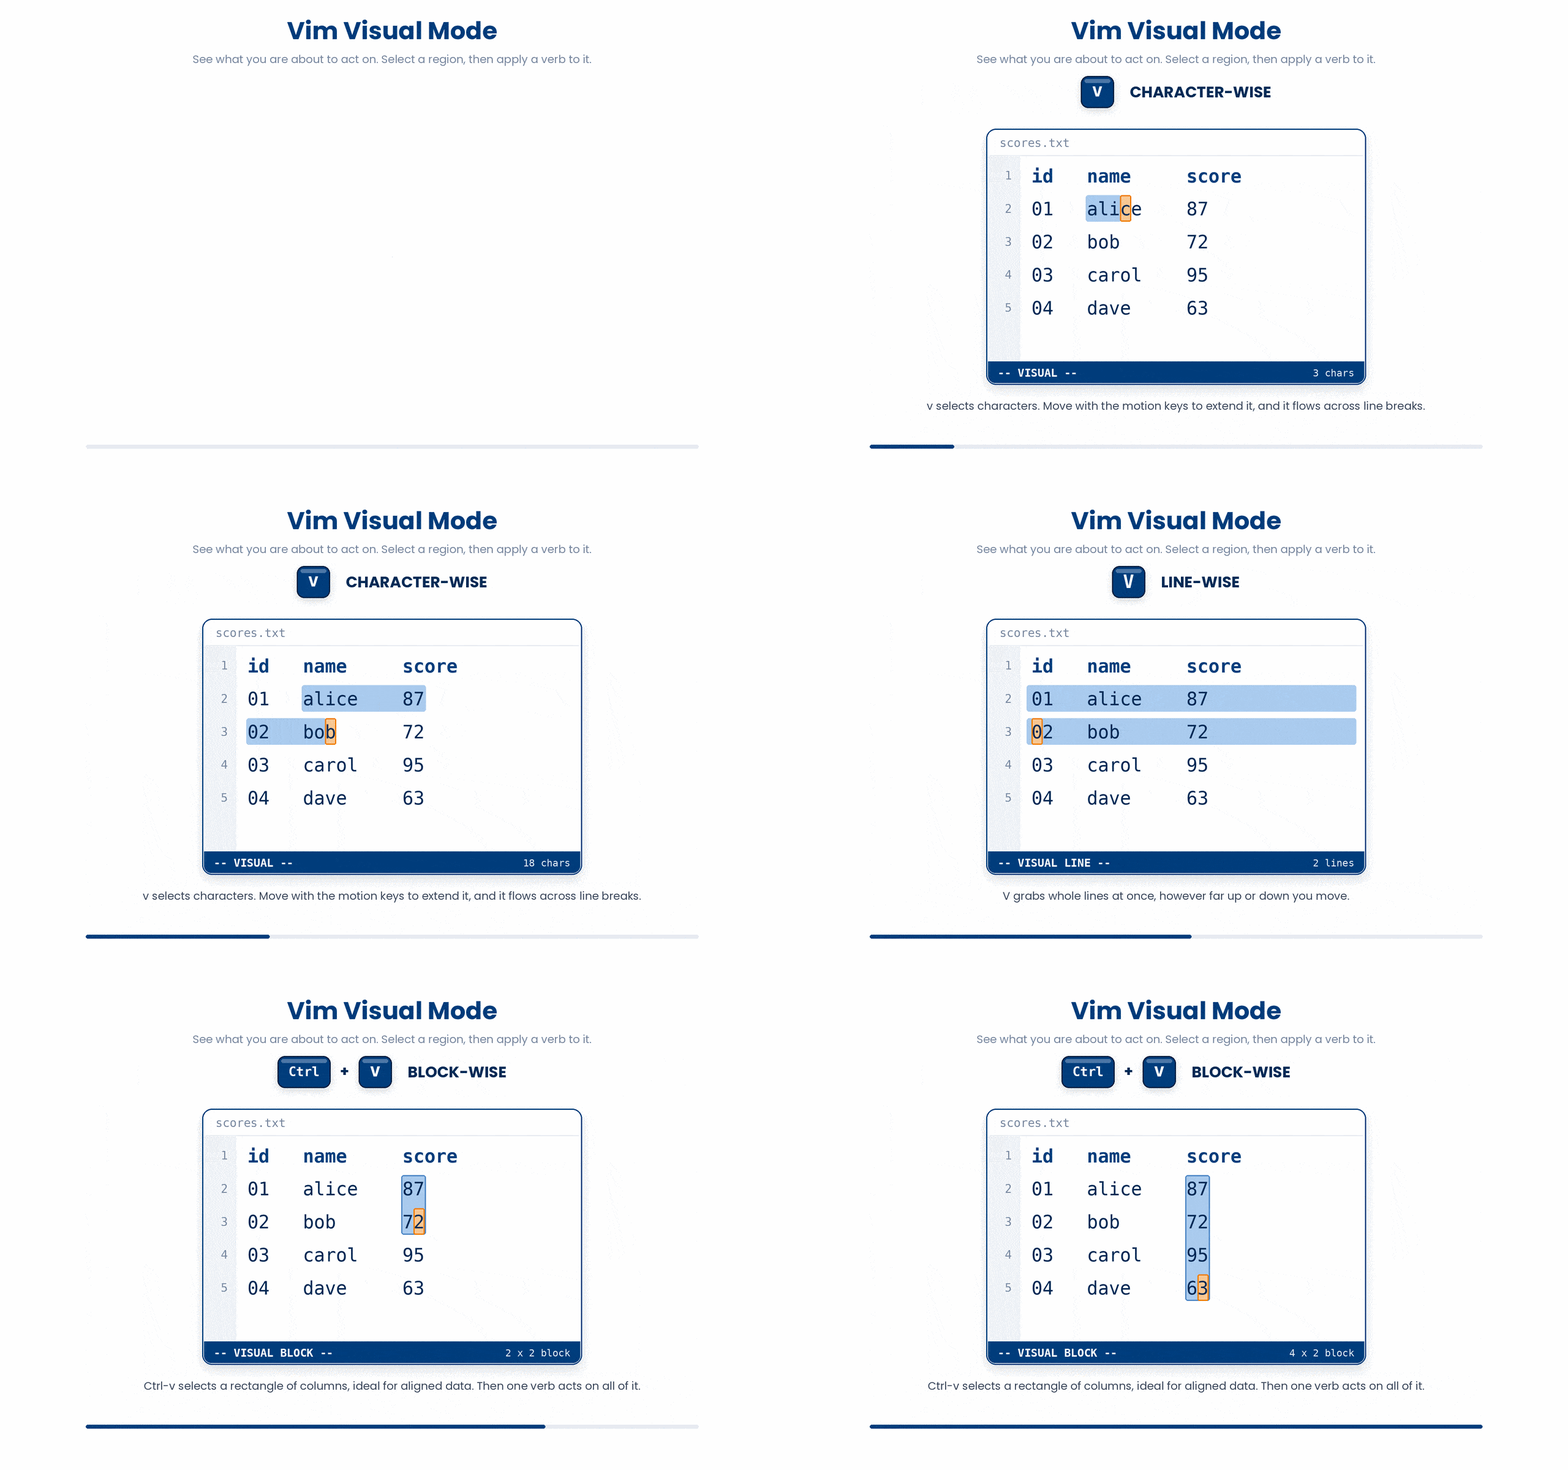
Sometimes you want to see what you are about to act on. Visual mode lets you select a region, then apply a verb to it.
- v - character-wise selection; move with the motion keys to extend it.
- V - line-wise selection (whole lines).
- Ctrl-v - block selection (columns) - useful for editing aligned data.
10 A Tiny Bit of Configuration
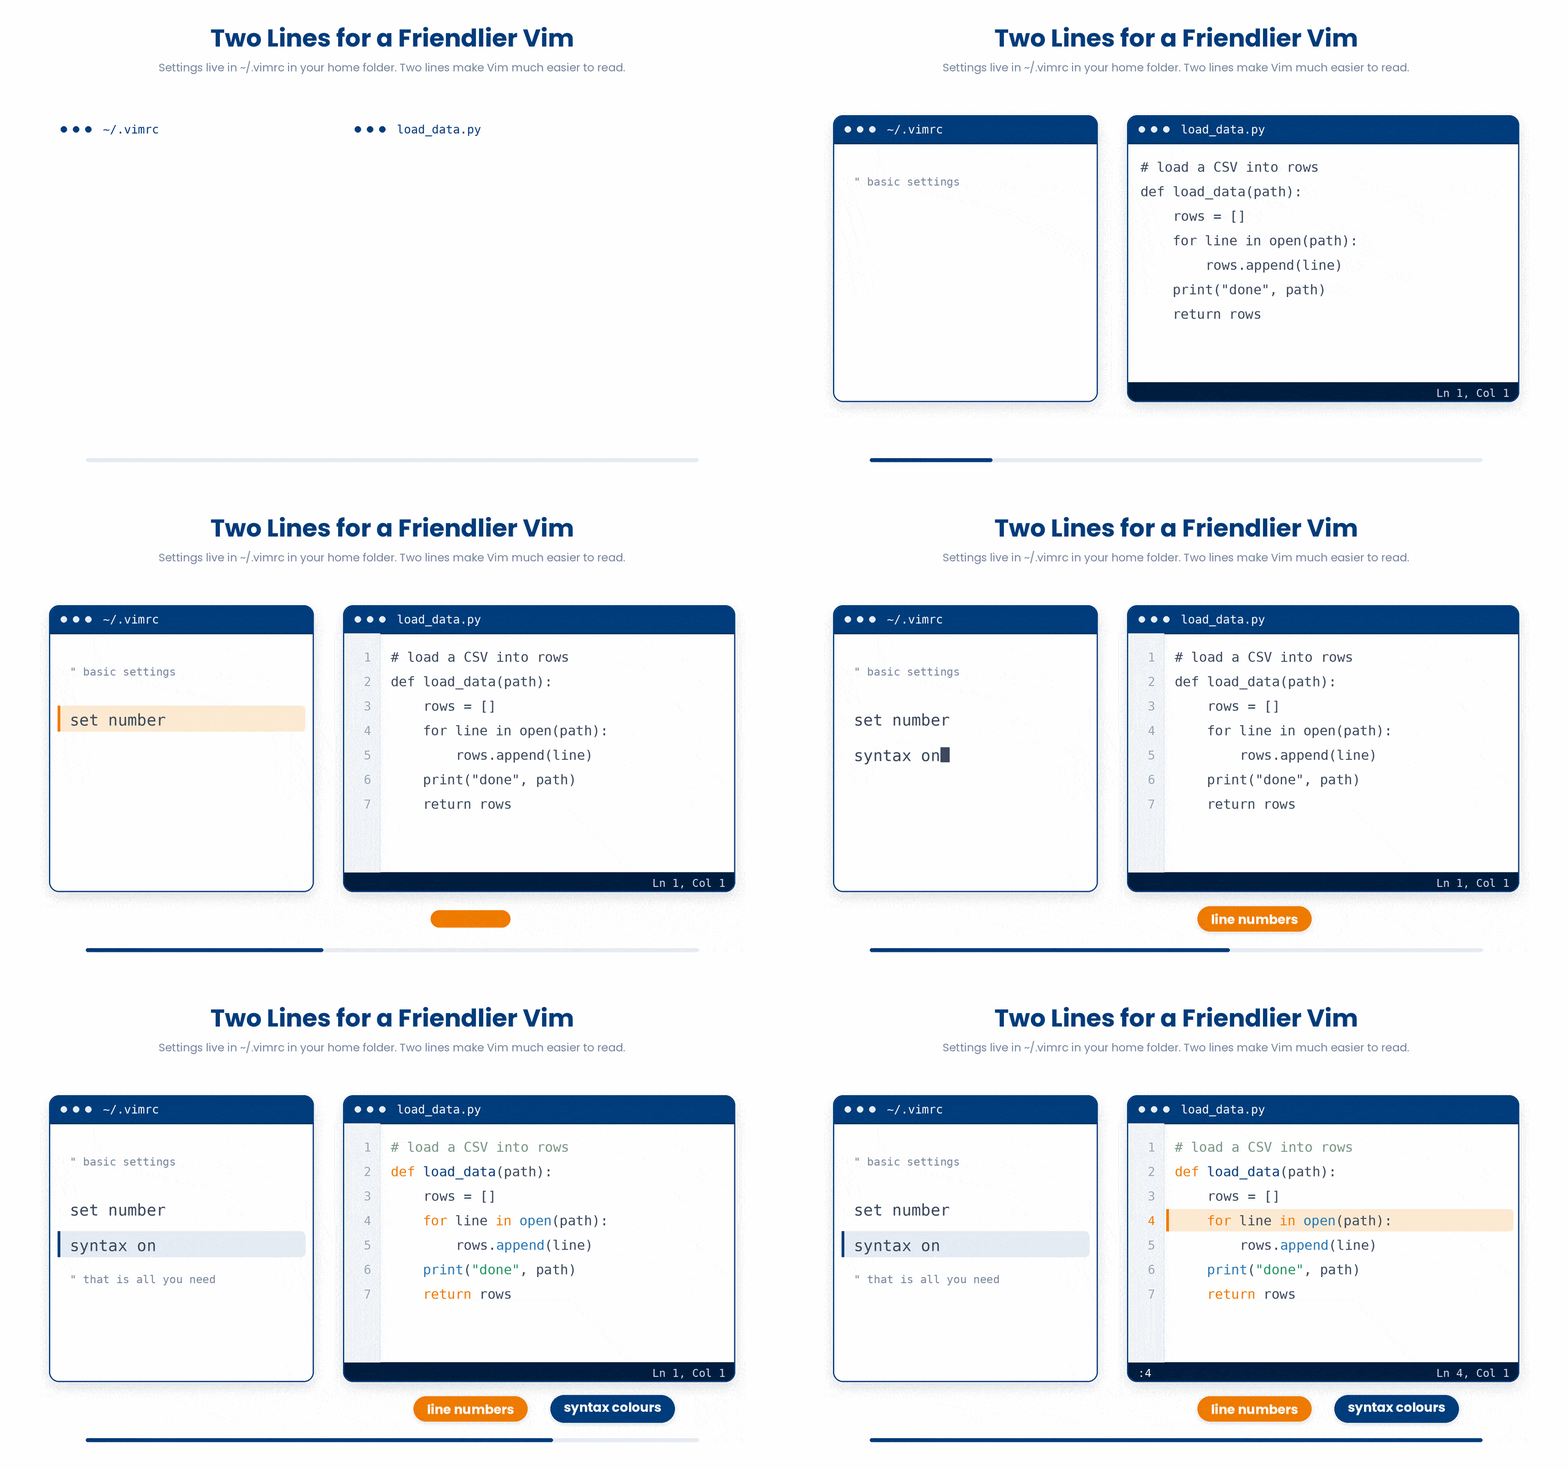
Vim reads its user settings from a hidden file called .vimrc located in your home folder. You do not need this file to use Vim, but adding just two lines will make your life much nicer.
Create or open the file by typing vim ~/.vimrc in your terminal, and add these two lines:
set number
syntax on
Note: The code above can only be done in vim
Vim reads settings from a file called .vimrc in your home folder. You do not need one to use Vim, but two lines make life much nicer. Create ~/.vimrc and add:
What this does:
set number displays line numbers on the left side, making it much easier to jump to specific lines (:42) when tracking down error messages.
syntax on enables color-coded syntax highlighting for scripts and configuration files, making them significantly easier to read.
Try it out — open your config, add the two lines above, then save and quit with :wq:
Try this snippet in the Bash Scratchpad on the right.
$ vim ~/.vimrcThis is plenty to get you started; you can always grow your .vimrc file later as you learn more about Vim.
11 Check your understanding
You have reached the end of the module. Try the same questions again — your answers here, paired with your pre-test answers, are how we measure what the module taught you. Answer every question and confidence rating, then click Submit and see results to view your score.
You have opened a file in Vim, made a mess, and want to quit WITHOUT saving. What do you type?
Which key takes you from Insert mode back to Normal mode?
In Normal mode, what does dd do?
What does :wq do?
Which command replaces every "draft" with "final" throughout the whole file?
In Normal mode, what does typing 5j do?
Using Vim's verb-plus-motion grammar, which command deletes from the cursor to the end of the current word?
Which line in your ~/.vimrc makes Vim show line numbers down the left side?
I can open a file in Vim, make an edit, save it, and quit.
I can explain the difference between Normal mode and Insert mode.
I can get out of Vim without saving when I need to.
12 Your results
Here is how your post-test answers compare with your pre-test answers. The pre/post pairing is the most reliable way to see what this module actually taught you.
Submit the post-test to see your results.
What is the one thing from this module that is still unclear to you?